Floor Jib Crane Overview: Basics of Floor Jibs Need to Know
Contents Table
- BZ type floor jib crane overview
- Main technical parameters & specifications of floor crane
- Installation precautions and assembly sequence
- The floor jib crane test run
- Safe operation of floor mounted jib crane
- Jib crane lubrication and maintenance
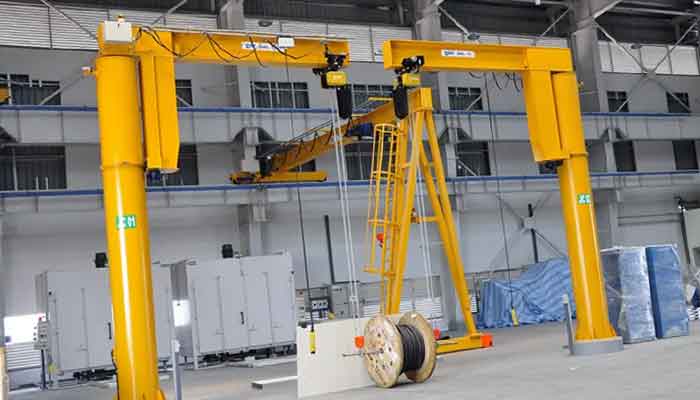
Overview of floor jib cranes
Pillar mounted jib cranes are a relatively new type of small and medium-sized lifting jib crane equipment. With a unique structure, the floor jib crane is safe and reliable, and has the advantages of high efficiency and energy savings, time savings, flexibility, and so on. It can also be used freely in 3D space. It can also demonstrate its superiority when working in close quarters or during intense lifting situations. Used extensively in workshops, warehouses, docks, and other fixed locations.
Standard Supply Scope of Floor Jib Crane
- Lifting Capacity: 0.5-10 ton
- Lifting Height: 1-10 m
- Span: 1-10 m
- Voltage: 220-440V 50/60Hz 3Phase
- Protection Class: IP44-IP55
- Working Temperature: -20-+40 ℃
- Lifting Mechanism: Electric Hoist
- Color: Blue, Yellow, Customized
Features of floor jib crane
The Floor Jib Crane's cantilever arm can be fitted with a C-track for the chain hoist's power supply cable, providing a compact and attractive appearance as well as a wide range of applications.
The cantilever supporting column is made of round pipe, with the two ends welded to the bottom plate and rotating shaft, and the upper part fitted with a waist ring track. To ensure the stability of the cantilever crane, the bottom plate is installed and fixed by embedded parts. To realize the hidden threading of the cable from the inside of the column, a through hole is opened on the rotating shaft.1.The waist loop track is used for cantilever Floor Jib Crane rotation, and the track can be equipped with a number of through holes for installing the rubber pier's physical rotation limit stop, allowing for a 0-360° angle limit.
The floor-mounted crane cantilever is constructed of welded I-beams and iron plates and is designed for the installation and operation of electric chain hoists.
The floor mounted jib crane's slewing mechanism uses a round tube as its shell and a spherical roller bearing inside to enable free rotation of the jib arm & cantilever. Due to the spherical roller bearing's performance, the floor jib crane can still be used safely and normally even if the concentricity of the waist ring and the pillar column is slightly deviated.
This floor jib crane is mostly utilized for hoisting tasks and cargo handling in manufacturing facilities, labs for scientific research, maintenance facilities, small freight stations, warehouses, and auto repair shops.
Advantages of floor mounted pillar jib cranes
Compact Design- The advanced design, lightweight structure, and superior performance,
- Reduces the hook operation distance to its minimum,
- effectively increases the rate of space utilization
Smooth, Fast Loading
- Jib crane and hoist trolley both have stepless frequency conversion control systems,
- stably braked, precise location, and stable and reliable performance,
Traveling steadily, quickly positioning, and resolving the problem of goods swing.
Safer, Reliable, Using Free Maintenance Design- The effect braking system significantly improves safety and reliability.
- Hardening and polishing the tooth surface will ensure that the floor crane operates smoothly.
Main Technical Parameters & Specifications
The floor jib crane parameters are standard for reference. Tailor-made floor mounted jib cranes are available.
| Lifting capacity | ton | 0.5 ton | 1 ton | 2 ton | 3 ton | 5 ton | ||||||||
| Lifting height(h) | m | 5 | 5.5 | 6 | 5 | 5.5 | 6 | 4 | 4.5 | 5 | 4.5 | 5 | 4.5 | 5 |
| Rotating radius R2 | m | 4 | 4.5 | 5 | 4 | 4.5 | 5 | 4 | 4.5 | 5 | 5 | 5.5 | 5 | 5.5 |
| Lifting speed | m/min | 8 / 0.8 | ||||||||||||
| Rotating speed | r/min | 0.7 | 0.5~ 1 | |||||||||||
| Travelling speed | m/min | 20 | ||||||||||||
| Rotating angle | ° | 180°, 270°, 360°, any angle | ||||||||||||
| Max.height H | m | 5.93 | 6.43 | 6.93 | 5.987 | 6.487 | 6.987 | 5.28 | 6.78 | 6.28 | 6.254 | 6.754 | 6.522 | 7.022 |
| Max.length L | m | 4.59 | 5.09 | 5.59 | 4.61 | 5.11 | 5.61 | 4.626 | 5.126 | 5.626 | 6.32 | 6.82 | 5.94 | 6.44 |
| Body weight | kg | 1733 | 1933 | 2028 | 1860 | 1960 | 2229 | 2478 | 2613 | 2748 | 3577 | 3742 | 4224 | 4430 |
Installation Precautions
The following points should be taken into consideration when installing the floor crane:
- Check the parts and components according to the cargo list once the Floor Jib Crane has been delivered to the site, and make note of any damage or deformation that may have occurred. Before being put together and put up, they need to be fixed, if any.
- Only professionals should perform the installation of floor jib.
- The location of the floor jib installation site must have a level, solid surface.
Procedures of FloorJib Crane Installation
When installing a column, make sure that it is horizontal to the ground. The anchor plate screws need to be tightly and continuously tightened. The foundation and the floor ought to be compatible. If equipped with electric hoists, the jib foundation should be embedded with power supply cables and grounding facilities. The grounding resistance must not be more than 4 ohms and must extend in a lead-out pattern from the center of the foundation.
Installation beam please sequence as below :
Raise the beam horizontally first, then insert the rotating shaft from the higher and lower pallets into the rotating drum.
- Mount the motor on the pallet.
- Install a motorized travelling trolley and an electric hoist on the jib beam track.
- Attach the steel wire rope (or C-shaped track) and sliding wire frame to the top of the beam. (The rope is tightened after being inserted into the sliding ring. The electrical control box on the electric chain hoist should be on the same side as a self-made sliding trolley that is in the C-shaped track.)
- Connect and mount all electrical devices on the beam, leaving adequate lengths of power lines. For wiring, see the electrical schematic diagram and electrical wiring diagram. The sliding coil or the C-shaped track trolley and the cable are bundled and fixed with binding wires.
The overall hoisting of the beam can be done once the aforementioned procedures have been completed.

Install the column on the pre-buried foundation (leave a layer of nuts under the cantilever crane to adjust the verticality of the column.)

Unscrew the lock nut on the rotating shaft of the column

Hang the hoist on the cantilever on the ground.
Lift the rotating arm with a hoisting tool and insert it into the column bearing chamber.
Open the door of the crane bearing room, reach in with the handle, and lock the rotating arm with the nut removed in step 2

The door of this bearing room is fixed with rivets when it leaves the factory, and it can be rivetted with rivets after installation.
Floor Jib Crane Tests
Commissioning preparation and inspection
- Turn off all power and inspect the entire jib crane machine in accordance with the technical specifications and drawing size, paying particular attention to the fasteners' firmness and the integrity of the metal structure.
- Verify that the Floor Mounted Crane's assembly and erection adhere to the specifications.
- Examine the insulating resistance of all electrical systems and all electrical apparatus using a megameter.
- Cut the power, ensure that the control circuit is accurate, and that all of the control equipment's moving components are flexible and reliable. If necessary, lubricate the moving parts.
No-load test
When moving up and down on the beam and left and right, the electric hoist ought to function without any problems. The swing arm cantilever should be adaptable and stable when rotating, stop at any location without sliding by itself, and have some upward deflection at the outer end.
Rated load test
Under rated load, the Floor Jib Crane hook is at the furthest end of the cantilever in extreme position to raise the heavy object, spin (manually or electrically), and test for 15 minutes. The farthest cantilever's declining value shouldn't be greater than R/125mm.
4.All of our floor mounted jib crane will be tested and inspected before delivery to clients and users.
Safe Floor Jib Crane Operation
- Floor Jib Crane operators should be familiar with the structural features and operation methods of the free standing pillar jib crane.
- When lifting objects for the first time in each shift to bring them close to the rated load, heavy objects should be lifted to a height of no more than 0.5 meters and then braked when they descend close to the ground.
- Overloading is permitted.
- Lifting items at an angle is prohibited.
- It is not permitted for people to go under the cantilever when the jib is under loads or during operation.
- When the floor jib crane is lifting heavy objects, it is not permitted to hang heavy objects in the air for a long duration of time.
- It is prohibited to place tools, parts, or other items on the beam in order to avoid falling and injuring people.
- In the event of a power outage, reset all control handles to the zero position.
- When not in use, the brake the floor jib to avoid slipping.
- Wind work above level 6, the operation of jib crane is prohibited.
Instructions for Operating Remote Control

- The red button at the top is the emergency stop switch.
- "Stop": press to stop the remote control function.
- "Open": press to activate the remote control function.
- "Up": controlled, slow hoist rise.
- "Down": controlled, slow descent of the hoist.
- "East": tap to control the hoist's left run.
- "West": tapping to control the hoist's right-hand operation.
- "South": pointing to one side to control the rotation of the cantilever floor jib crane.
- "North": pointing to the other side to control the rotation of the cantilever floor mounted crane.
- "Control No. 1": a pointing device that, when pressed, controls the operation of the No. 1 cantilever floor jib crane.
- "Control No. 2": a pointing device that, when pressed, regulates the operation of the cantilever Floor Jib Crane No. 2.
- Both "Spare 1" and "Spare 2" are spare keys that will be used in the future.
Notes:
- After activating the remote control function, press "on" + "up" or "down" again to quickly lift the hoist.
- To operate the floor jib crane, press the remote control's corresponding "Control 1" or "Control 2" button. Both buttons can be pressed to control two jib cranes at the same time.
- The time interval between each of the two consecutive key presses must be greater than 0.5 seconds to prevent the remote control from malfunctioning due to frequent key presses.
- 4If any problems arise while using the equipment, please do not dismantle it yourself for repairs, but instead contact us as soon as possible.
Lubrication Maintenance
- The service quality and life span of the floor mounted pillar cranes are heavily reliant on regular and proper lubrication. cAs a result, the traveling and lifting mechanisms of the Floor pillar jib crane should be lubricated on a regular basis.
- Inspect the remote control on a regular basis: check the transmitter's integrity, whether each action is normal, whether the emergency stop is effective, and so on.
- The remote control should be placed in a specific location, with someone in charge, and should not be placed at random.
- In order to ensure normal operating signals, replace the remote control battery on time.
- The driving protective devices are not to be dismantled at will and must be kept intact.
- The spreader must be checked on a regular basis.
- The lifting mechanism's brake should be adjusted to firmly support 1.25 times the rated load (during lowering braking), and the operating mechanism's brake should be adjusted to stop the mechanism's operation in time without slipping.
Article by Bella ,who has been in the hoist and crane field since 2016. Bella provides overhead crane & gantry crane consultation services for clients who need a customized overhead travelling crane solution.Contact her to get free consultation.