Pillar Jib Crane Installation & Floor Foundation Construction
Freestanding pillar jib crane installation & floor foundation construction guide to make your floor mounted jib crane installation easy & simple. Check now
Guide Outline: Installation of Floor Mounted Pillar Jib Cranes
Jib cranes are indispensable tools in various industries, providing efficient material handling solutions. Whether you're setting up a new workspace or upgrading your operations, the installation process of floor-mounted pillar jib cranes demands careful planning and precision. In this guide, we'll walk you through the essential steps, from foundation construction to completing the installation, ensuring a safe and successful outcome.
Foundation Construction
What should be noted on floor mounted foundation construction ?
Soil Analysis and Load-Bearing Capacity:
Before breaking ground, conducting a thorough soil analysis is paramount. Understanding the soil's bearing capacity helps determine whether it can adequately support the crane's weight and loads. This analysis sets the foundation for a secure installation.
Foundation Design:
Collaborating with a structural engineer is a prudent step in designing the foundation. This professional will factor in the crane's weight, load capacity, and the dynamic forces it will experience. An optimized design ensures both stability and longevity.

Concrete Foundation:
The cornerstone of a strong foundation lies in the quality of the concrete mix used. Opt for high-quality concrete with the appropriate strength to meet load requirements. Equally important is ensuring that the foundation's depth and dimensions align with the specifications outlined by the crane's manufacturer.
Anchor Bolts Placement:
Positioning the anchor bolt holes accurately is crucial for secure attachment of the support pillar. Ensuring proper alignment guarantees a solid connection between the foundation and the crane's structure.
Reinforcement (If Needed):
For cases where the crane's load capacity or soil conditions require extra support, consider incorporating reinforcing bars (rebar) into the foundation. Rebar reinforcement enhances the foundation's strength and resilience.
Curing Time:
Patience is key during the curing process. Allow the concrete foundation ample time to cure and gain its maximum strength. Rushing this step can compromise the foundation's integrity and, consequently, the crane's stability.
With the foundation firmly in place, we move on to the installation steps that will bring your floor-mounted pillar jib crane to life.
How to construct the foundation of floor mounted pillar jib cranes
Constructing a proper foundation for a floor-mounted jib crane requires careful planning and execution to ensure stability and safety. Here's a general guide on how to construct the foundation:
Note: The following steps provide a basic overview. It's important to consult the manufacturer's specifications and guidelines for your specific crane model before beginning foundation construction.
Site Preparation:
- Clear the area where the crane will be installed of any debris, vegetation, or obstacles.
- Mark the exact location of the crane's support pillar on the ground.
Excavation:
- Excavate the marked area to the required depth, as specified by the manufacturer or a structural engineer.
- Ensure the excavation is level and free of loose soil or debris.
Formwork:
- Build formwork to define the dimensions of the foundation. Use lumber or prefabricated formwork materials.
- Ensure the formwork is sturdy, properly aligned, and level.
Reinforcement (If Required):
- If the crane's load capacity and soil conditions demand it, place rebar (reinforcing bars) inside the formwork to enhance the foundation's strength.
- Follow engineering recommendations for rebar placement and spacing.
Pouring Concrete:
- Mix concrete according to the manufacturer's recommendations or industry standards.
- Pour the concrete into the formwork, ensuring even distribution and proper consolidation.
Leveling and Smoothing:
- Use a screed board to level the surface of the poured concrete.
- Smooth the surface with a trowel to achieve a uniform finish.
Anchor Bolt Installation:
- While the concrete is still wet, insert anchor bolts into the foundation at the designated locations for the crane's support pillar.
- Ensure the anchor bolts are straight and properly aligned.
Curing:
- Allow the concrete to cure based on the recommended curing time provided by the manufacturer or industry standards.
- Proper curing enhances the concrete's strength and durability.
Inspection:
- Once the foundation has cured, inspect it for any cracks, unevenness, or other issues.
- Address any concerns before proceeding with crane installation.
Mounting the Crane:
- Lift the crane's support pillar onto the anchor bolts embedded in the foundation.
- Align the pillar vertically using a level and shims if necessary.
Securement:
- Securely fasten the support pillar to the anchor bolts using nuts, washers, and appropriate fastening techniques.
- Tighten the nuts to the manufacturer's specified torque.
Final Checks:
- Double-check the crane's alignment, rotation, and stability.
- Ensure all connections are secure and all safety features are functioning.
Remember that proper foundation construction is critical for the safe and efficient operation of the crane. If you're not experienced in construction or unsure about any aspect of the process, consider consulting with professionals or involving a structural engineer to ensure a reliable foundation.
 Foundation construction of pillar jib crane for reference. If you have any, please feel free to contact us.
Section Floor mounted pillar jib crane installation
What to be noted when install the pillar jib cranes
When installing pillar jib cranes, there are several important considerations to keep in mind to ensure a safe and successful installation. Here's a list of key points to note:
- Manufacturer's Guidelines: Always follow the manufacturer's installation instructions and guidelines specific to the crane model you're installing.
- Foundation Preparation: Ensure the concrete foundation is properly cured, level, and meets the dimensions and depth specified by the manufacturer.
- Foundation Load-Bearing Capacity: Confirm that the foundation's load-bearing capacity is suitable for the crane's weight, lifting capacity, and dynamic forces during operation.
- Anchor Bolts: Anchor bolts should be properly positioned, securely embedded in the foundation, and aligned accurately.
- Support Pillar Alignment: The support pillar must be positioned vertically and aligned accurately with the anchor bolts. Use a level to check alignment.
- Torque Specifications: Follow the manufacturer's torque specifications when fastening anchor bolts, support pillar components, and other critical connections.
- Hoist and Trolley Installation: Carefully install the hoist and trolley according to the manufacturer's instructions, ensuring proper alignment and secure attachment.
- Electrical Connections: Follow the provided wiring diagram for electrical connections to the hoist, trolley, and control panel. Ensure proper insulation and grounding.
- Safety Features: Install safety features such as limit switches, emergency stop buttons, and warning labels as specified by the manufacturer.
- Load Testing: Perform load testing to ensure that the crane's lifting capacity matches the specifications. Gradually increase the load to verify stability.
- Operational Clearances: Ensure there is enough clearance around the crane's rotating arc and the load to prevent collisions with obstacles.
- Operator Training: Train crane operators on safe operation, load limits, controls, emergency procedures, and proper communication.
- Maintenance Access: Ensure that maintenance personnel can easily access components for inspections, lubrication, and repairs.
- Compliance with Regulations: Adhere to local regulations, safety standards, and building codes during installation to ensure compliance and safe operation.
- Documentation: Maintain comprehensive documentation of the installation process, load testing results, alignment checks, and any adjustments made.
- Professional Assistance: If you're unfamiliar with crane installations, consider involving experienced professionals or consulting the manufacturer's technical support.
- Site-Specific Considerations: Consider the specific conditions of your installation site, including available space, obstacles, and any unique challenges.
- Regular Inspection and Maintenance: Establish a regular inspection and maintenance schedule to keep the crane in safe and efficient operating condition.
Remember, safety is paramount during installation. If you encounter challenges or uncertainties, seek assistance from experts or consult the manufacturer for guidance. Proper installation ensures not only safe operation but also the longevity and optimal performance of your pillar jib crane.
How to Install a Pillar Jib Crane : Installation Steps
Installing a floor-mounted pillar jib crane involves a series of steps to ensure its proper alignment, stability, and safe operation. Here's a general guide on how to install a floor-mounted pillar jib crane:
Note: Always refer to the manufacturer's installation manual and guidelines specific to your crane model for accurate instructions.
Pre-Installation Preparation:
- Review the manufacturer's installation manual thoroughly.
- Ensure that the foundation and workspace meet the specifications required for your crane model.
- Gather all necessary tools, equipment, and components.
Foundation Inspection:
- Verify that the concrete foundation has cured properly and meets the required dimensions and depth as specified by the manufacturer.
Assembly of Crane Components:
- Assemble the jib arm, support pillar, hoist, trolley, and any other components according to the manufacturer's instructions.
Placing the Support Pillar:
- Position the support pillar over the anchor bolts embedded in the foundation.
- Ensure the pillar is aligned vertically using a level and make adjustments if needed.
Securement of the Support Pillar:
- Attach nuts, washers, and fastening components to the anchor bolts.
- Tighten the nuts to the specified torque using a torque wrench to ensure secure attachment.
Attaching the Jib Arm:
- Attach the jib arm to the top of the support pillar using appropriate bolts and fasteners.
- Ensure the jib arm is level and aligned with the support pillar.
Hoist and Trolley Installation:
- Install the hoist and trolley onto the jib arm following the manufacturer's instructions.
- Make sure all connections are secure and components are properly fastened.
Electrical Connection:
- Follow the manufacturer's wiring diagram to connect the hoist and trolley to the power supply.
- Ensure all electrical connections are properly insulated and secured.
Safety Features and Labels:
- Install safety features such as limit switches, emergency stop buttons, and warning labels as specified by the manufacturer.
Testing and Calibration:
- Test the crane's rotation, hoisting, and trolley movement to ensure smooth operation.
- Perform load tests to confirm that the crane's lifting capacity matches the specifications.
Operator Training:
- Train crane operators on how to safely operate the crane, including controls, load limits, and safety protocols.
Final Inspection:
- Conduct a comprehensive inspection of all components, connections, and safety features.
- Confirm that the installation meets safety regulations and manufacturer's guidelines.
Documentation:
- Keep detailed documentation of the installation process, load testing results, and any adjustments made.
Ongoing Maintenance:
- Establish a maintenance schedule to inspect, lubricate, and maintain the crane regularly for safe and efficient operation.
Proper installation is crucial for the safe and efficient operation of the floor-mounted pillar jib crane. If you're not experienced in crane installation, consider seeking assistance from professionals or consulting the manufacturer's technical support.
Safety Considerations
Safety is the cornerstone of any industrial installation, and the installation of floor-mounted pillar jib cranes is no exception. Here are key safety considerations to keep in mind:
Expertise and Training:
Ensure that personnel involved in the installation are experienced and well-trained. Crane operators should receive comprehensive training in safe operation and emergency procedures.
Personal Protective Equipment (PPE):
Mandate the use of appropriate PPE, including helmets, gloves, safety glasses, and harnesses, to mitigate potential risks during installation.
Load Limits and Capacity:
Adhere strictly to load limits and capacity specified by the manufacturer. Overloading the crane can compromise its structural integrity and lead to accidents.
Fall Protection:
Provide fall protection measures, such as guardrails and safety harnesses, when working at heights during installation.
Lockout/Tagout Procedures:
Implement lockout/tagout procedures during electrical connections to prevent unexpected energization.
Communication:
Establish clear communication channels between installation team members to ensure smooth coordination and safety.
First Aid and Emergency Response:
Have a well-equipped first aid kit on-site and a designated plan for addressing emergencies.
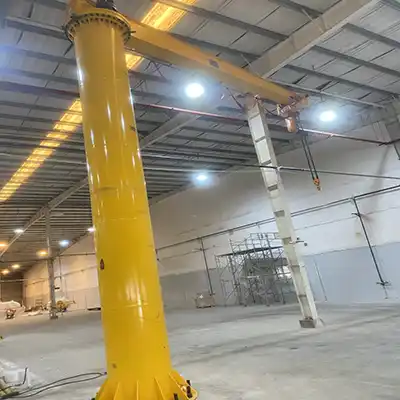
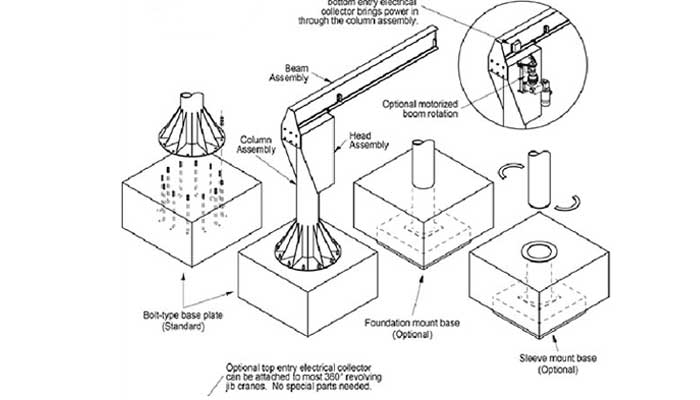
Presentation of Pillar Jib Crane Installation
The most often utilized lifting equipment in manufacturing today is the floor mounted jib crane. What are the benefits of using a floor mounted column jib crane? It is highly reliable and ideal for regular shortdistance lifting activities. It is easy to use and increases work efficiency significantly. So, how does a floor mounted column jib crane get installed? Here's a diagram to help you understand.

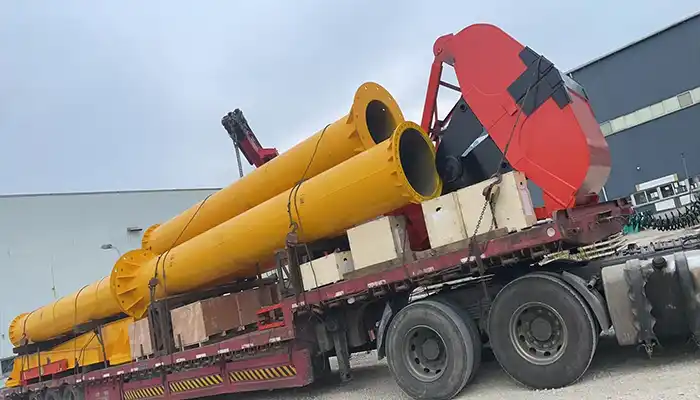
Column Installation
Sleeve the column into the inner ring of the bottom plate, weld and fix the bottom plate and the column on both sides of the bottom plate, then weld a number of ribs to the bottom plate and the column to complete the cantilevered bottom plate installation of the column.

Installation of End Plate and Waist Ring Track
Adjust the location of the rotating shaft of the column jib crane and the end plate first, then weld and fix it to ensure the rotating shaft's verticality. Then insert the end plate into the column, weld it, and secure it to the column according to the dimensions shown in the drawing. To complete the installation, sleeve the waist ring track into the column, adjust the correct location according to the size of the drawing, weld and fix it to the column.

Installation of Rotary Sleeve
The bearing seat and the revolving cylinder are welded and fixed according to the size of the drawing through the connecting plate, and pressed into the spherical roller bearing, and then the left side of the revolving sleeve is sealed with the bearing pressure plate. The connecting plate of the sealing plate is welded on the right side of the rotating cylinder, and the sealing plate is connected by bolts. The sealing plate is removed during onsite installation, and the current collector is installed inside the rotating sleeve. After the internal parts of the rotating sleeve of the column cantilever crane are installed, the sealing plate is installed and the installation is completed.

Bracket Installation
The bearing seat and revolving cylinder are welded and fastened according to the drawing size through the connecting plate, and then pressed into the spherical roller bearing, with the bearing pressure plate sealing the left side of the revolving sleeve. The sealing plate's connecting plate is welded to the right side of the rotating cylinder, and the sealing plate is bolted together. During onsite installation, the sealing plate is removed and the current collector is inserted inside the spinning sleeve. The sealing plate is placed after the internal pieces of the rotating sleeve of the column mounted jib crane have been mounted.

Onsite Installation of The Free Standing Pillar Jib Crane
Remove the round nut from the column, secure the cantilever on the column through the rotating shaft and waist ring track, then install the round nut on the rotating shaft from the inside of the slewing device, and finally install the slip ring and lock in turn Polyurethane nuts. The round cable enters the slip ring slewing mechanism after passing through the inside of the column and the center hole of the rotating shaft. Inside the slewing mechanism, the slip ring bracket and carbon brushes are installed. Through the contactor switch in the electric control cabinet in the control cabinet.
Frequently Asked Questions (FAQs) on Foundation Jib Cranes
What are the consequences of inadequate foundation construction?
An inadequate foundation compromises crane stability, leading to operational inefficiencies and safety hazards.
Can I install a jib crane on an existing concrete floor?
Yes, you can, provided the floor's load-bearing capacity is sufficient to support the crane's weight and loads.
What's the role of anchor bolts in crane installation?
Anchor bolts provide a secure connection between the crane's support pillar and the foundation, ensuring stability.
Can I install a crane without professional assistance?
While possible, professional assistance is recommended for proper foundation construction and crane installation, especially for those without experience.
How often should I inspect the crane and foundation after installation?
Regular inspections should be conducted as part of routine maintenance, and any signs of wear, misalignment, or damage should be addressed promptly.
What permits or regulations should I be aware of during installation?
Local building codes and regulations should be followed to ensure compliance and safety.
How do I ensure my jib crane's longevity?
Regular maintenance, lubrication, and adherence to load limits are key to ensuring your crane's longevity.
Can I relocate a jib crane after installation?
Yes, jib cranes can be relocated, but the process requires careful planning, dismantling, and reinstallation following manufacturer guidelines.
Article by Bella ,who has been in the hoist and crane field since 2016. Bella provides overhead crane & gantry crane consultation services for clients who need a customized overhead travelling crane solution.Contact her to get free consultation.